Install on Windows
This page explains how to install Mugnsoft components. It provides the download link and the procedure to get your Mugnsoft services up and running on your Windows system (Windows XP+).
Note:
Configure and Install Mugnsoft’s Webserver
Configure and Install Mugnsoft’s Webserver from .zip file
# download the zip file by specifying the version you want from:
https://mugnsoft.com/bin/<version>/mugnsoft-webserver-<version>.windows-amd64.zip

# unzip the downloaded file and cd into it
unzip mugnsoft-webserver-<version>.windows-amd64.zip && cd webserver

# update the API and WEB port in the webserver.json file
notepad webserver.json

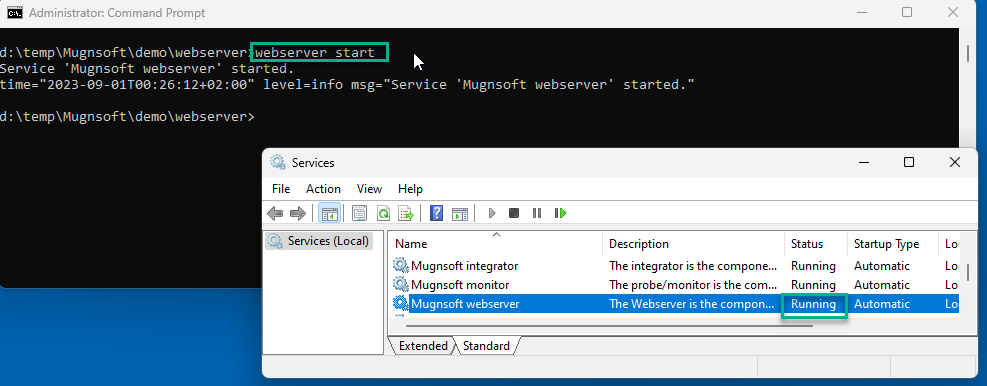
# proceed with the installation as a Windows service and start the service, open a DOS cmd:
webserver.exe install && webserver.exe start
Note:
At this stage, the service should be up and running.

You can now connect to the webserver’s web server: open your browser and go to (https://localhost:9090/ where 9090 is the port defined in your webserver.json file).
Configure and Install Mugnsoft’s Integrator
Configure and Install Mugnsoft’s Integrator from .zip file
# download the zip file by specifying the version you want from:
https://mugnsoft.com/bin/<version>/mugnsoft-integrator-<version>.windows-amd64.zip

# unzip the downloaded file and cd into it
unzip mugnsoft-integrator-<version>.windows-amd64.zip && cd integrator

# update the API and WEB port in the integrator.json file
notepad integrator.json

# proceed with the installation as a Windows service and start the service, open a DOS cmd:
integrator.exe install && integrator.exe start
Note:
At this stage, the service should be up and running.

You can now enable that integrator from the Mugnsoft’s webserver components list: open your browser and go to (https://localhost:9090/web/html/layout.html#/server where 9090 is the webserver port).
Configure and Install Mugnsoft’s Monitor
At startup the monitor component will autmatically look for his host version of web browsers and download the related webdrivers. To do so the probe will need access to the following webdriver website:
- https://chromedriver.chromium.org/downloads
- https://github.com/mozilla/geckodriver/releases/
- https://developer.microsoft.com/en-us/microsoft-edge/tools/webdriver/
Note:
Note: Access to the above three webdriver’s websites are not mandatory as you can manually download the webdrivers and put them in the drivers folder of your Mugnsoft’s monitor component (<monitor_installDir\drivers>).
| Browser | webdriver | webdriver download URL |
|---|---|---|
| Chrome | Chromedriver | You can download them here |
| Firefox | Geckodriver | You can download them here |
| Edge | msedgedriver | You can download them here |
| Safari | Built-in (no webdriver required) | - |
Always download the browser driver that matches your browser version. Using mismatched version would result in a error during runtime.
Install Browser extension’s Mugnsoft IDE plugin (for automatic code generation)
This plugin allows for automatic code generation. We will use it to generate the Mugnsoft scenarios to be played by Mugnsoft’s monitor component.
Check Mugnsoft IDE documentation: here
| Browser | plugin URL |
|---|---|
| Chrome | You can install it from here |
| Firefox | You can install it from here |
Configure and Install Mugnsoft’s Monitor from .zip file
Now that the pre-requisite have been fullfilled, we can proceed with the same installation as the other components.
# download the zip file by specifying the version you want from:
https://mugnsoft.com/bin/<version>/mugnsoft-monitor-<version>.windows-amd64.zip

# unzip the downloaded file and cd into it
unzip mugnsoft-monitor-<version>.windows-amd64.zip && cd monitor

# update the API and WEB port in the monitor.json file
notepad monitor.json

# proceed with the installation as a Windows service and start the service, open a DOS cmd:
monitor.exe install && monitor.exe start
Note:
At this stage, the service should be up and running.

You can now enable that monitor from the Mugnsoft’s webserver components list: open your browser and go to (https://localhost:9090/web/html/layout.html#/server where 9090 is the webserver port).
Note for all the components:
Each component can be started as the Windows service from the binary itself or be run as a process:
[webserver.exe|monitor.exe|integrator.exe] [start|stop|restart|run]